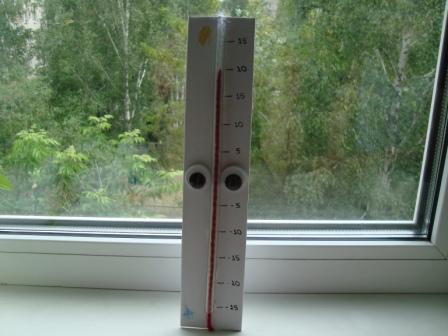
Познакомившись с книгами Кэти Рос, я не могла не проникнуться духом этой женщины. Она живёт в мире взрослых, но при этом всю жизнь носит в душе девочку, которая любит кукол, в том числе и бумажных, и амулеты со жвачками и обожает создавать вещи своими руками. Книги Кэти заряжают доброй творческой энергией и пользуются заслуженной популярностью:
With more than one million copies of her books in print, Kathy Ross has written over fifty titles and her name has become synonymous with "top quality craft books". Following twenty five years of developing nursery school programs and guiding young children through craft projects, Ross has authored many successful series, including "Crafts for Kids Who Are Learning about...", "Girl Crafts", and "All New Holiday Crafts for Kids".
Вы можете познакомиться с тематическими сериями коллекций Рос на сайте "Answers.com". А я расскажу вам историю одной поделки, которую смастерили мы с дочкой по описанию из книги "Crafts for Kids who are Learning about Weather".

Термометр приглянулся мне сразу, как только я увидела его в книге. Точнее говоря, дело было так: я стала листать книгу - и на первой же поделке Даша приготовила бумагу, ножницы и клей и закричала: "Я хочу сделать это!" Я переворачивала страницы, а она продолжала: "И это! И это тоже! И вот эту поделку давай сделаем". В общем, скоро стало ясно, что выбирать придётся мне - и я остановилась на термометре. По описанию Кэти Росс, дополненному цветными иллюстрациями, мы смастерили его легко и непринуждённо:
Mr. Thermometer
A thermometer is used to tell us how hot or cold it is.
Here is what you need:
- clear plastic straw
- 2-inch (5-cm)-wide strip of cardboard taller than the straw
- white paper
- white glue
- red and white yarn
- sun- and snowflake-shaped sequins (or colored paper to cut your own)
- scissors
- markers
- cellophane tape
- red pom-pom
- two wiggle eyes
Here is what you do:
- Cover the cardboard by wrapping it in white paper to make it look like the back of a thermometer.
- If you are using a flexi-straw, cut off the flexi part.
- Cut a red piece of yarn and a white piece of yarn that are both about 4 inches (10 cm) longer than the height of the cardboard.
- Tie the ends of the two pieces of yarn together.
- Thread the end of the red yarn through the straw by pushing it in the straw and then sucking on the other end to bring it through.
- Tie the ends of the red and the white yarn together to make a loop throgh the straw.
- Tape the straw to the center of the cardboard with the loop behind the cardboard.
- Glue the wiggle eyes on each side of the straw and the red pom-pom on the straw below the eyes for a nose.
- Glue a sun near the top of the thermometer and a snowflake near the bottom.
- You can copy some of the numbers from a real thermometer on your thermometer puppet if you want to.
When it is cold, the red line of mercury on the thermometer is down low, and when it is hot, the red moves up higher on the thermometer. Pull on the loop of yarn from behind to make the red line on Mr. Thermometer move up or down.
Мы с дочкой внесли в процесс изготовления термометра небольшие коррективы: вместо трубочки для коктейля взяли тонкий прозрачный шланг; нитки скрутили, совместили крест-накрест по центру и сложили пополам; решили обойтись без носа-помпона; а солнышко и снежинку Даша нарисовала сама.
Благодаря этой поделке дочка наконец-то поняла принцип работы термометра и с удовольствием выставляет на нём такую же температуру, как за окном.

!!! ах какой термометр симпатичный у вас получился!
Спасибо! Нам он тоже нравится.